How to Paint Kitchen Cabinets: A Step-By-Step Guide
Is your kitchen due a refresh? A lick of paint can instantly transform your kitchen and extend the lifetime of your cabinets. At Pat McDonnell Paints, we help customers achieve a full makeover at a fraction of the cost of a new kitchen.
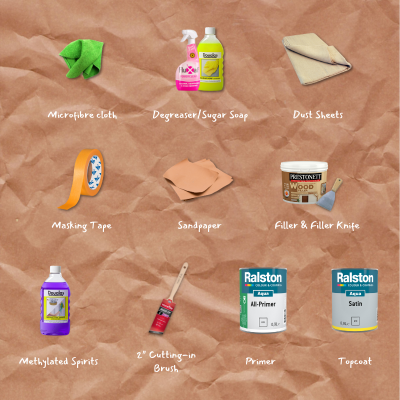
Tools for the Job
- ✔ Dust Sheets
- ✔ Deltec Gold Masking Tape
- ✔ Fluxaf Power Clean or Douglas Sugar Soap
- ✔ A microfibre cloth
- ✔ 80 – 100 grit sandpaper
- ✔ Methylated Spirits
- ✔ Prestonett Filler
Step 1: Protect Any Surfaces You Don’t Want to Paint
Empty all your cupboards and drawers and store the contents in a safe place.Remove all cabinet hardware (i.e., knobs and handles).
Lay down dust sheets to protect your floor.
Mask hinges and where the cabinetry meets walls, tiling or appliances. We recommend using Deltec Gold Masking Tape to ensure sharp lines and zero residue.
Step 2: Thoroughly Clean the Units
Over the years, grease, dirt and dust can build up on your cabinets which can wreak havoc on paintwork. As such, it’s important to fully clean the units before picking up a paintbrush. Household cleaners tend to leave a film, so we always recommend a degreaser (such as Fluxaf Power Clean) or sugar soap (such as Douglas Sugar Soap).
💡 Pro Tip: For a flawless finish, make sure to throroughly clean your units before sanding. Otherwise, the act of sanding may compress dirt into your cabinets!
Step 3: Sand Down the Cabinets
To improve paint adhesion, lightly sand your cabinets with fine-grade (80 - 100 grit) sandpaper. Once done, wipe down cabinets with methylated spirits to remove any trace of dust. Allow to dry.
Step 4: Fix Minor Blemishes
If your cabinets are looking a little worn, then you can fill small imperfections (e.g. holes, cracks, dents, scratches etc.) by applying a good quality ready-mixed filler with a filling knife. We like using the Prestonett filler range – ask in-store for the most appropriate filler for your cabinets. Once the filler has dried, lightly sand these spots to remove excess product and wipe with a clean damp cloth.
Step 5: Apply A Coat of Primer
The primer you use will depend on whatever material your cabinets are made from, so check with one of our team to find out the most suitable primer for your project.Before opening your tin, shake it well. On opening the tin, use your Pat McDonnell Paints stirring stick to mix the paint thoroughly.
When applying your primer, start by cutting-in with a 2” brush.
You can paint the remaining sections using a mini-roller.
Leave plenty of time for the primer to fully dry, check the tin for drying times, we often advise leaving it overnight if you can.
💡Product Spotlight: For most kitchen cabinets, we recommend using Ralston All-Primer. Not only can this primer be tinted to the colour of your choice, but it is also bio-based and kinder to our environment.
Step 6: Paint the Units
- For a smooth and durable topcoat, we recommend one coat of paint from the Ralston Aqua range in the colour and finish of your choice. This paint can be tinted to any colour and offers a finish that is both attractive, scrubbable and hard-wearing.
- Cut-in and apply your paint with a good-quality brush or roller.
- Leave to dry fully before reaffixing cabinet doors.Don’t be tempted to put the cabinets back too quickly and risk an accidental smudge!
💡Pro Tip: If you feel more coats are needed, be sure to allow each coat enough time to fully dry before applying the next coat.
A beautiful kitchen from West & Green painted in Studio Green No. 93 - Farrow & Ball

A colourful kitchen painted by Peter Dabrowski (Cork) in Inkwell - Colourtrend

Have a question about how to paint your kitchen cabinets? Why not call into your local branch of Pat McDonnell Paints and speak with one of our experts! Fast & free delivery on all orders.


